| Date tip published: | 12/13/2004 |
| Description: | Domino Designer 6 supports using Java for Domino agents. The Domino Designer client can be used to create, edit and compile Java agents. However, there is no Java debugger when coding Java agents in Domino Designer.
WebSphere Studio has an excellent Java debugger. This tip will show you how you can debug a Domino agent using WebSphere Studio. Currently in Domino Designer 6 a local Java agent can use the WebSphere Studio debugger. Note that Domino server agents can NOT use the WebSphere Studio debugger. |
To learn more about WebSphere Studio and writing Domino Java agents use the following links:
Beginner Java Programming for Notes Domino 6
Intermediate Java Programming for Notes Domino 6
WebSphere 5 for Domino Developers Package
Introduction to WebSphere 5 for Domino Developers
 Debug Domino Java Agents with WebSphere Studio Debug Domino Java Agents with WebSphere Studio
This tip will show you how to debug Domino Java agents using WebSphere Studio. The following software is required:
- Lotus Domino Designer 6 client
- WebSphere Studio 5
If you do not have WebSphere Studio than you can get a free trial version at IBM's website. TLCC has published a helpful tip on how to download and install this trial version.
Click here to view TLCC's tip on installing the trial version of WebSphere Studio.
There are several steps to writing and debugging a Domino Java agent:
- Write the agent code in WebSphere Studio
- Create the agent in Domino Designer and import in the class
- Debug (if necessary) the code in WebSphere Studio
The first two steps were covered in the last TLCC Developer Tip.
Click here to view the tip on writing agents in WebSphere Studio.
This tip assumes you are familiar with WebSphere Studio, and can create a Java agent in Domino Designer. If you are not familiar with WebSphere Studio you may want to take TLCC's course, Introduction to WebSphere 5 for Domino Developer. TLCC also has a free demo version of the Introduction to WebSphere Studio 5 course available at the TLCC website.
Click here to get more information on the free demo version of Introduction to WebSphere Studio
Local Domino Java agents can be debugged with WebSphere Studio. This tip will assume you have WebSphere Studio and Domino Designer 6 running on the same machine. Note that this feature is not documented by Lotus and is therefore not supported. You can expect that Java debugging in Notes and Domino 7 to have more functionality and perhaps allow the debugging of server based agents.
If you are creating a server based agent that will run on a schedule or when documents are created or modified than you can simply change the agent type to run locally to do your debugging and then change it back to run on the server once you have debugged your code.
Setting up debugging requires two steps:
- Verify that the appropriate DLL file is in the right directory.
- Set a Notes.ini variable to indicate that Java debugging is enabled
Once setup, the agent can be run and control of the agent will be handled by WebSphere Studio.
 Procedure: Verify the needed DLL file is present Procedure: Verify the needed DLL file is present
Please note that this information was tested on Notes 6.0.3. Earlier versions of Notes 6 may not have the correct file installed. If not, than upgrade your version of Notes to at least 6.0.3.
The dt_socket.dll file must be in the Notes program directory for debugging to work. Using Windows Explorer, verify that this file is present in the Notes program directory. If this file is not in your Notes program directory than copy the dt_socket.dll file from the jvm\bin directory that is in your Notes program directory.
If the correct file is not in the Notes program directory than Notes will crash when the Java agent is run and the notes.ini variable for Java debugging is present.
Procedure: Add the Required Notes.ini Statement
The next step is to add the required Notes.ini statement to your notes.ini file. This file is typically in your Notes program directory but may be located in other places on your computer. Make sure you have the correct Notes.ini file if you have more than one version of Notes on your computer.
- Start Windows Notepad (you can use any text editor you want).
- Go to File - Open. Change the "Files of type" to All Files.
- Navigate to your Notes program directory and choose the Notes.ini file and click Open to open this file.
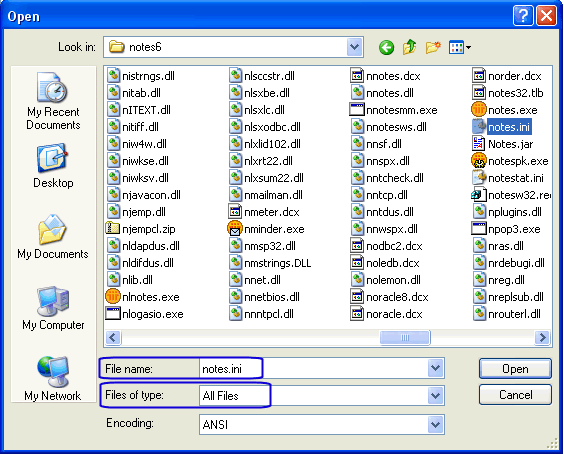
- Add the following line to the end of the notes.ini file:
JavaEnableDebug=1

- Save your file and exit Notepad. NOTE: Do not run any local Java Domino agents until you have configured WebSphere Studio and WebSphere Studio is running.
- Restart Notes.
Procedure: Debug Java agents in WebSphere Studio
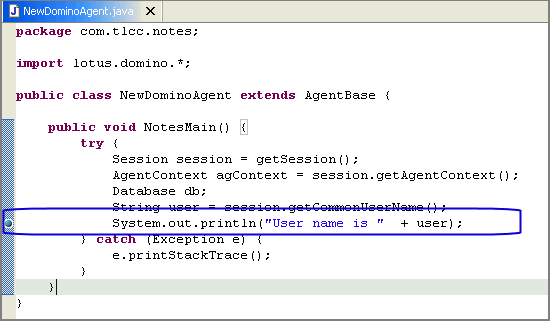
Now that the appropriate line has been added to the Notes.ini file, the agent can be debugged with WebSphere Studio. For this tip a WebSphere Studio project called "Domino Agents" was created. A Domino agent was created in WebSphere Studio (NewDominoAgent.class) and this code was imported into the agent. These steps were all covered in the previous tip on creating Domino Agents in WebSphere Studio. The sample code used is as follows:
| package com.tlcc.notes; |
| import lotus.domino.*; |
| public class NewDominoAgent extends AgentBase { |
| public void NotesMain() { |
| try { |
| Session session = getSession(); |
| AgentContext agContext = session.getAgentContext(); |
| Database db; |
| String user = session.getCommonUserName(); |
| System.out.println("User name is " + user); |
| } catch (Exception e) { |
| e.printStackTrace(); |
| } |
| } |
| } |
Once the Java agent has been created in Domino use the following steps to debug the agent:
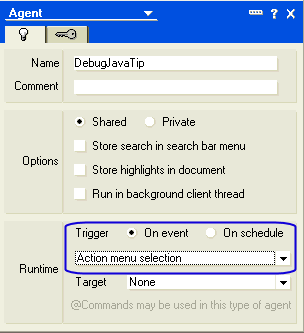
- In Domino, set the agent to run from the Agent Menu and save the agent.
- Start WebSphere Studio (if not running) and go to the Java Perspective and open the source code for the agent you want to debug. Set a breakpoint for the agent on the appropriate line by double-clicking in the left margin. A blue ball will appear in the margin.
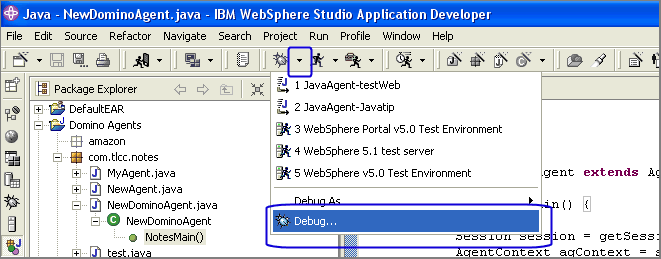
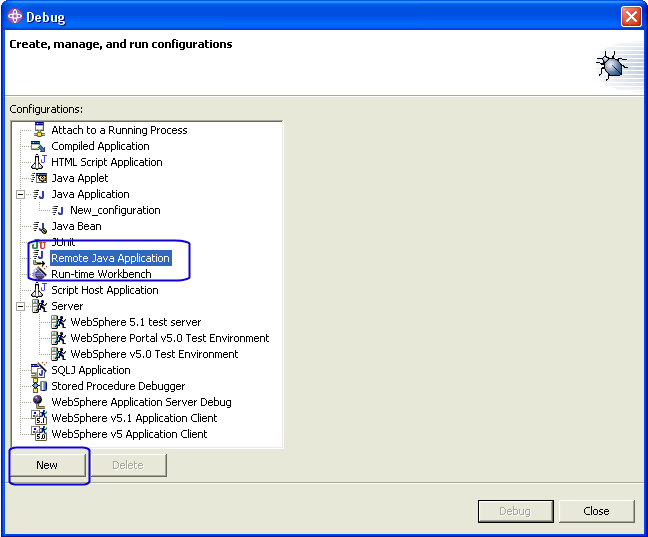
- Click on the down arrow to the right of the Debug icon in WebSphere Studio. DO NOT click the Debug icon. Clicking on the down arrow will present a menu list. Choose Debug... from the menu list.
- Highlight "Remote Java Application" and then click the [New] button.
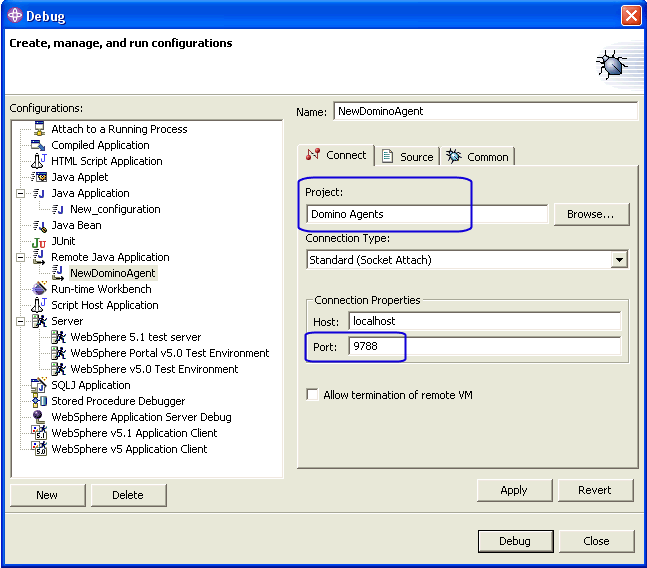
- If you had your source code open in the Java editor the right project should have been filled in automatically. Verify the project name is correct. Change the port number to 9788. This is the port that Domino Designer will use for the remote debugging.
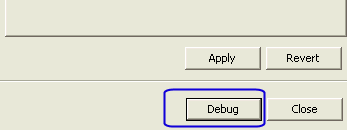
- CLick on the [Debug] button. This will cause WebSphere Studio to attach to the Domino remote debugger port and wait for an agent to run.
- If an agent is run in Domino AND a breakpoint is set in the source code than the focus will change to WebSphere Studio when the agent is started. Go back to the Notes client and run the agent from the Action menu. The source code will be opened in WebSphere Studio's debug perspective and the code will stop execution on the line with the first breakpoint.
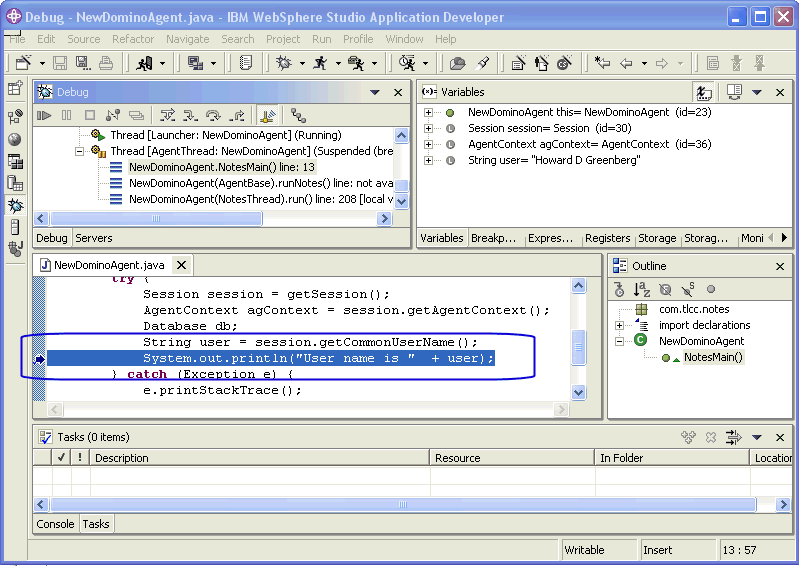
- At this point the WebSphere Studio debugger can be used to examine variables and step through the code line by line.
Procedure: Debug Java agents in WebSphere Studio
The Debug view shows the current status of the remote debugger. The image below shows the debugger is currently attached to a Domino agent called "NewDominoAgent." The buttons at the top are active and are used to control the execution of this agent. See the table below for an explanation of the buttons in the Debug View.
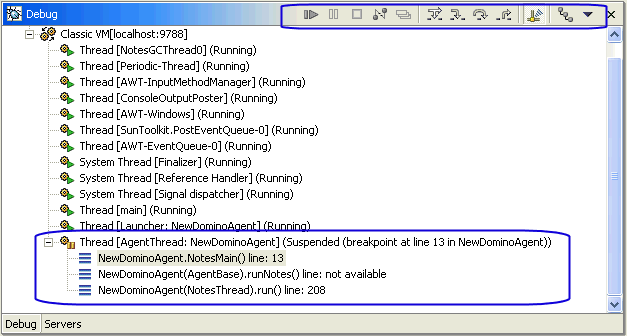
The following table explains the actions in the Debug view. This view is used to control program execution.
 A few tips!!! A few tips!!!
- Stepping into the code line by line may not be very useful since the debugger will step into the many classes used by the Domino objects (Database, Document, etc.) Use Step Over to stay within your own code and avoid stepping into the Domino classes.
- Use Disconnect to stop the Remote Debugger from running when the Java Domino agents are invoked. You can also invoke this by right-clicking in the Debug View.
- There is no support for hot code changes. You can not change the code in the Editor while in Debug mode and have the changes immediately reflected. You must re-import the code into the Domino agent.
|
|