| Date tip published: | 05/06/2008 |
| Description: | This tip covers how to troubleshoot issues with the web preview feature in Domino Designer to preview local Notes databases. |
To learn more about Domino web development use the following links:
Developing Domino 8.5 Web Applications
Developing Domino 9 Web Applications
 Troubleshooting the Web Preview Feature Troubleshooting the Web Preview Feature
Domino Designer has the ability to preview databases in a web browser. The databases can be on either a Domino server or your local computer. Previewing a database on a Domino server is usually trouble free. However, previewing local databases can have some issues. When a local database is previewed in a browser, the HTTP task (the same one used with a Domino server) is used to render the local database. This tip will cover previewing local databases, since that is where most issues arise.
The local web preview function has no way to look-up people or groups for authentication. Therefore, in the ACL of the database to preview, you must add the Anonymous entry and set its access to Reader, Author or Editor, depending on the access level you are testing. If the Anonymous entry is not present in the ACL, then the Default entry can be used. NOTE: To test security and any functionality that requires the user to authenticate the server will require that the database be moved to a Domino server.
 Starting the Web Preview Feature Starting the Web Preview Feature
Follow these steps to start the web preview feature:
- Start Domino Designer and open a database.
- Go to a list of Design elements (forms, views, framesets, pages, etc.). NOTE: Not all design elements can be web previewed. The rule of thumb is that design elements that can be seen in a web browser can be previewed. A Script Library or Outline can not be previewed.
- Select the element to preview and choose Design | Preview in Web Browser | browserToUse from the menu.
- Your chosen web browser will open and the design element will be seen in the browser.
An open document or view can also be previewed from the Notes client. Open the document or view and choose Actions | Preview in Web Browser | browserToUse from the menu.
Web Preview Requirements
Before developers can use Notes or Designer to web preview a local Notes database, they need to set both their computer system and their Notes client for Internet communications.
The Web Preview feature has the following system requirements:
- Notes must be running on a Windows workstation.
- A supported browser must exist on the system (Internet Explorer, Mozilla, or Netscape Navigator.)
- The computer must be set up for local TCP/IP communications.
- If the local area network uses a proxy server, the proxy server needs to be bypassed for local communications. This is a setting in your browser.
The Web Preview feature has the following Notes requirements:
- Your Notes or Designer client must specify the browser to use.
- Notes must be set up for Internet communications over a TCP/IP connection.
- The database that you want to preview must allow browser access (set Anonymous access to Reader, Author or Editor in the ACL.)
- The design element that you want to preview must not be hidden from the web.
Quick Test of Local Web Preview
The steps below will test your system's web preview capability.
- Download the database attached below to your Notes data directory.

- Open this database in your Notes client. Choose yes when prompted to create a cross certificate. You may also get an ECL alert (Execution Control List). These can be avoided by signing the webtest.nsf database with your user id or by simply opening the database in Designer and re-saving the one view and one form that is in this database.
- Choose Actions | Preview in Web Browser | Default Browser.
- Your browser should start and display the view. If it does then your web preview function is operating properly.
Troubleshooting the Web Preview Feature
If the test above did not work, then review the remainder of this tip to determine the cause. The most common reason that the web preview feature does not work is that some other task on your computer is using port 80. This port must be available for the Domino web preview feature to work. Below is an example of a browser screen where the web preview task did not work. Sometimes you will get an error message that the server could not be found.
Some browsers, like Internet Explorer, will "hide" the actual error message. In Internet Explorer, go to Tools | Internet Options and then the Advanced tab. Under Browsing, remove the check next to "Show friendly HTTP error messages" to see the actual error message. This can be useful in troubleshooting.
If you use the ESET NOD32 Antivirus program see the TLCC tip on how this may affect the web preview feature.
Click here to view the tip on using ESET NOD32 with the web preview feature.
Testing to see if Port 80 is already in use
One way to test if port 80 is in use is to use the netstat windows command. Follow the procedure below to test for port 80 in use.
- Stop Notes, Domino Designer and the Domino Administrator client if running.
- Open a command prompt in Windows.
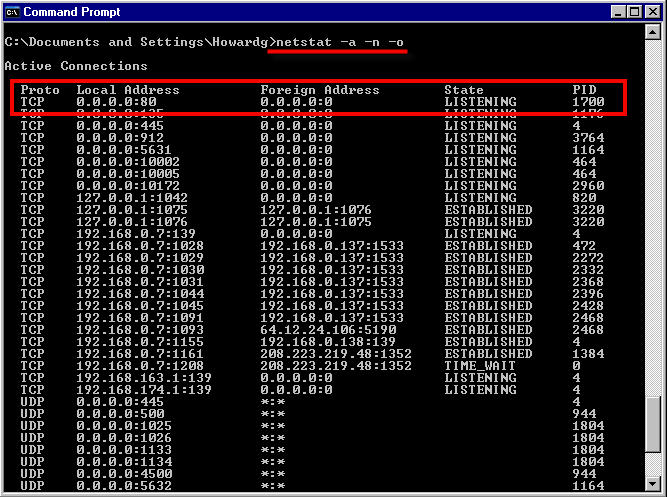
- Type in "netstat -a -n -o" at the prompt and press Enter. You will get a listing of all the ports in use. Note which one has ":80" after the address and the state is "listening." Then make a note of the PID number. In the example below, the highlighted line uses port 80 and the PID is 1700. This number is used by Windows to identify processes that are running on your system.
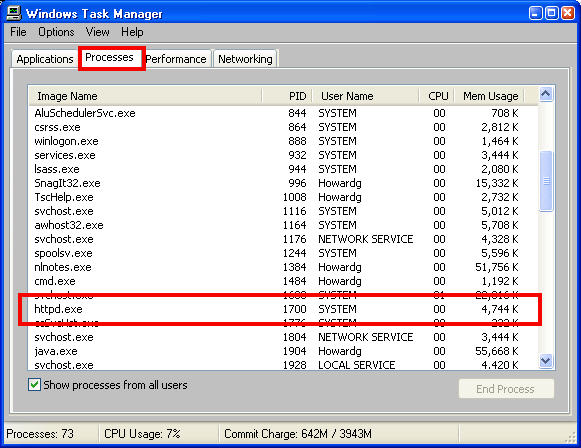
- The next step is to determine which program is using port 80. Press <CTRL><ALT><DELETE> to get to the Windows task manager. Choose the Processes tab. Click on the PID column to sort by the PID number. Look for the PID number that was identified in the previous step (in the example above, it is 1700). The image below shows the httpd.exe program is using port 80. In this example it is the Apache HTTP server.
- Find the program using port 80 and either shut it down or reconfigure it to use another port. It may also be a service that starts automatically when Windows starts.
An easier way to find the active ports in use is to use a freeware program called Active Ports. It can be downloaded from the following URL (this may not work in Windows 7):
http://www.download.com/Active-Ports/3000-2085_4-10062969.html
Install this program and start it to see the ports in use. It will show the full path to the offending program that is using port 80, as shown in the screen image below. Note that Norton will flag this program as spyware, since it is interrogating the ports.
A common "offender" is Skype. It can be configured to listen on port 80. This can be changed in Skype by choosing Tools | Options and then click on the Advanced\Connections tab. Remove the check from "Use port 80 and 443 as alternatives for incoming connections". Then quit and then restart Skype to have this option take effect.
TLCC has also been told by some of our students that the Trend Micro Internet Security program may cause issues with the HTTP preview. If you use the Trend Micro Internet Security program than right click on the TM icon in the system tray and select Exit. This shuts down the entire TM suite. The HTTP server can then be started and then the Trend AV / Firewall restarted and the HTTP server will continue to work as long as Notes is not ended.
A similar problem might be encountered with EST NOD32 Antivirus.
Click here to read more about this issue in another TLCC tip
Any security type program might block access to port 80. We have had other reports that AVG Anti-Virus will do this. Turn off the AVG Active Surf-Shield option to prevent AVG from blocking port 80.
Starting the Web Preview Task from a Command Prompt
Another trouble-shooting step is to start the web preview task from a command prompt. This will let you see any error messages that may appear as the Domino HTTP task starts. The steps below will verify the web preview task in Domino Designer can start successfully. Note that these steps will require you to restart your system when done.
- Shutdown both your Notes client and Domino Designer.
- Start a Command Prompt.
- Use a cd command to switch to your Notes program directory. If your Notes program is in c:\notes7 than type in cd \notes7 and pressing Enter.
- Type in "nhttp preview" and press Enter. You will be prompted for your password. Enter that and press Enter again.
- The Domino HTTP task will start. Below is a successful startup. Note the last line. You can ignore the other warning messages.
There is no way to stop the HTTP task from the command window. Restart your computer when done to end the HTTP task. However, if your HTTP server started successfully you can test it by using "localhost" as the server name in the url to a database in your local Notes data directory. Below is an example of a url that uses the web preview feature to preview a local database. Localhost refers to your computer, followed by the database name, and then the UNID of the view. You can also substitute the name of the view for the UNID.
http://localhost/WebTest.nsf/587F1276358734ED85257441007043C6
Start Notes as Administrator
In some of the more recent 64 bit versions of Windows (like Windows 7), Windows prevents writes to the default Notes installation folder in the "Program Files (x86)" directory. This can prevent the Web Preview Task from functioning. One solution is to start the Notes client executable with Administrator privileges.
To do this, first close Notes and Designer if running. Next, right-click on the shortcut to launch Notes in the Start menu or desktop and choose Run as administrator from the context menu as shown below. If necessary, repeat the same actions with Designer. A system restart may also be necessary.
Verify Localhost is the correct IP Address
If your Domino HTTP task did start successfully, but you still get error messages when trying to preview a local database, check to be sure that "localhost" is defined in your system. This should point to your local IP address (127.0.0.1). Start a command prompt and type in "ping localhost". It should ping and return a reply to the 127.0.0.1 address.
If it does not use this address or you do not get a reply, verify that the hosts file in the windows\system32\drivers\etc directory contains an entry like:
localhost 127.0.0.1
This line is used to "translate" localhost into the numeric IP address. If it is not there, than add it. Make sure a pound sign (#) is not in front of this line. That is used for comments and means the line is not used. Also, the hosts file should not have any file extensions.
|