| Date tip published: | 04/10/2006 |
| Description: | Many companies use Domino as the web engine for their public web site. Google is the premier search engine for web searches. There are several books on how to change a web site to improve the ranking a web page has in Google's indexes. This tip will show you how to do one improvement to make sure the Google search engine indexes all the pages in your Domino database by using Google SiteMaps. |
To learn more about web development using Domino use the following links:
Developing Domino 6 Web Applications
Using LotusScript in Domino 6 Web Applications
 Domino Databases and Google Searches Domino Databases and Google Searches
Many companies use Domino as the web engine for their public web site. Google is the premier search engine for web searches. There are several books on how to change a web site to improve the ranking a web page has in Google's indexes. This tip will show you how to do one improvement to make sure the Google search engine indexes all the pages in your Domino database. Google introduced SiteMaps as a way to allow the website owner to define what pages should be indexed.
There are a few issues that can prevent Google from searching a site. The first issue is that the search engine will only follow HTML links. Any links in JavaScript code will not be followed. If your site uses Action Hotspots or Buttons to create navigation links then Domino may use JavaScript to render that to the browser. Google will not be able to follow those navigation links. A Domino view also may not be completely indexed. For example, the image below is a Domino view:
The Next Hotspot uses the @DbCommand("Domino"; "ViewNextPage") formula. This generates the following HTML code by the Domino web server:
<a href="" onclick="return _doClick('85257148006604CB.95fa2dedbf014f0a85257148006b4fed/$Body/0.788', this, null)"><img src="/tips/golfpart.nsf/95fa2dedbf014f0a85257148006b4fed/$Body/0.7E8?OpenElement&FieldElemFormat=gif" width="22" height="17" border="0"><font size="2" face="Verdana">Next</font></a>
Note that the URL is generated by the doClick JavaScript function and not by the href parameter in the anchor (link.) This link will not be followed by the Google search engine and therefore the rest of the view will not be indexed.
There are other issues mentioned by the Google Information for Webmasters guidelines. It also states that "If you decide to use dynamic pages (i.e., the URL contains a "?" character), be aware that not every search engine spider crawls dynamic pages as well as static pages. It helps to keep the parameters short and the number few." Just about every URL generated by Domino (other than links that the developer coded) use a question mark character and therefore could be considered dynamic pages by Google. Note that Google will search URLs with a question mark depend on the number of parameters appended after the question mark.
Assume we are the webmaster for BigOak Golf and want to make certain that our catalog is fully indexed by Google. The view above shows some limitations that will prevent full indexing of our site. Google recognizes that there are many sites that use dynamic URLs, JavaScript or Flash for site navigation and introduced SiteMaps to accommodate these sites. These allow a webmaster to send a link to sitemaps which contains a list of all the pages at the website to index. A sitemap is nothing more than an XML listing of the pages at the website. Google's specification for the SiteMaps is as follows:
<?xml version="1.0" encoding="UTF-8"?>
< urlset xmlns="http://www.google.com/schemas/sitemap/0.84">
< url>
< loc>http://www.example.com/</loc>
< lastmod>2005-01-01</lastmod>
< changefreq>monthly</changefreq>
< priority>0.8</priority>
</url>
</urlset>
The url entry (in green above) is repeated for each web page that should be indexed by Google. The only required tag in the url entry is the loc tag. The other tags (lastmod, changefreq, and priority) are optional.
Note that the loc tag (which is the URL) must be the full URL to the page, including the "http://" and must have the following characters encoded (Domino has the @urldecode function to assist with this.)
Character | Escape Code |
Ampersand | & | & |
Single Quote | ' | ' |
Double Quote | " | " |
Greater Than | > | > |
Less Than | < | < |
|
Click here to see the complete Google specification for the SiteMap XML file.
 Creating a Google SiteMap in Domino Creating a Google SiteMap in Domino
You can easily create a SiteMap in a Domino database by creating a special view to hold the pages you want indexed and a View template form to control the formatting of the page. There are two steps:
- Create a view to output the url tag (along with the loc tag as well as any of the optional tags)
- Create a form to act as the view template
 Creating a View to Output the URL Tag Creating a View to Output the URL Tag
- Create a new view (for illustration purposes let's call it the SiteMap view.)
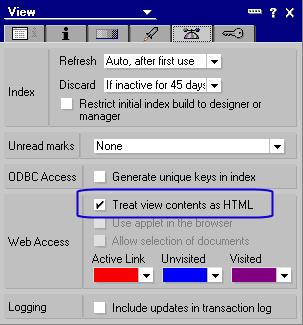
- Set the view's properties to treat the contents as HTML
- Design the first column's formula to output the start of the url and loc tags:
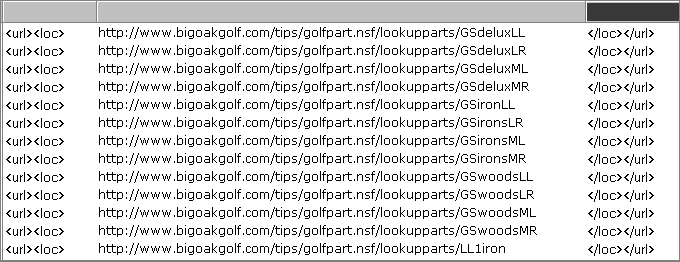
"<url><loc>"
- Design the second column to output the actual url to each page in the database (use a view selection formula to restrict certain pages.) The example below computes the url. The lookupparts view has all the golf parts sorted by PartID in the first column. This creates a url that will point to the particular part in the database.
"http://www.bigoakgolf.com/" + @WebDbName + "/lookupparts/" + PartID
- Specify the third column to output the closing tags for the url and loc tag.
"</loc></url>"
- The completed view will look like the following in Domino Designer:
- Optionally you can add other columns to display the optional tags that Google accepts (which were listed in the Google SiteMap specifications.)
 Creating a View Template Form Creating a View Template Form
Use the following steps to create a template for the view. This will be used to output the xml needed for the urlset tag.
- Create a new form (in the same database as the view above) and call it "$$ViewTemplate for Sitemap" where Sitemap is the name of the view.
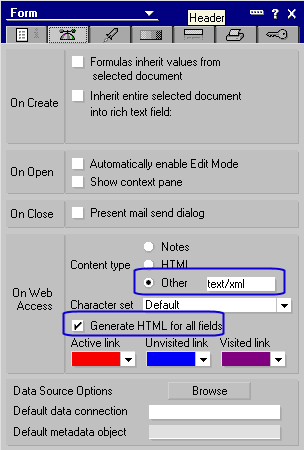
- Change the form properties to always output HTML. Change the Content type to be "Other" and type in "text/xlm" (with no quotes) for the content type.
- Add the following text to the beginning of the view template form:
<?xml version="1.0" encoding="UTF-8"?><urlset xmlns="http://www.google.com/schemas/sitemap/0.84">
- Embed the Sitemap view after the above text by choosing Create | Embedded Element | View from the menu. Choose the Sitemap view.
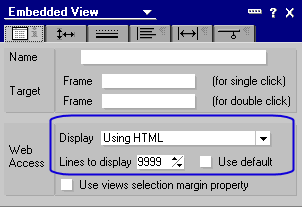
- Change the embedded view's properties to display the view using HTML. Change the lines to display to a bigger number than you ever expect this database to grow to.
- Add the following text after the embedded view:
</urlset>
- Save the form.
To test out the sitemap use Internet Explorer (IE) to view the sitemap view. IE will take properly formed XML and format it. If there is an error (the XML is not well-formed) than Internet Explorer will show an error message. Below is a screen image of the XML that was output after following the steps in this tip. Note that this is a partial list and does not display the closing urlset tag:
 Submitting the Google SiteMap Submitting the Google SiteMap
The next step is to submit your sitemap to Google. You can submit multiple sitemaps to Google. This means you can create a Sitemap for each Domino database you want indexed. This makes the task of creating Sitemaps easier for the Domino Designer since a Domino view will only display documents from the database it is in.
Before submitting your Sitemap you will need a Google account. There is a link at the url below to sign into your Google account or to create a Google account.
The link to get started is:
Follow these steps to submit a Sitemap to Google:
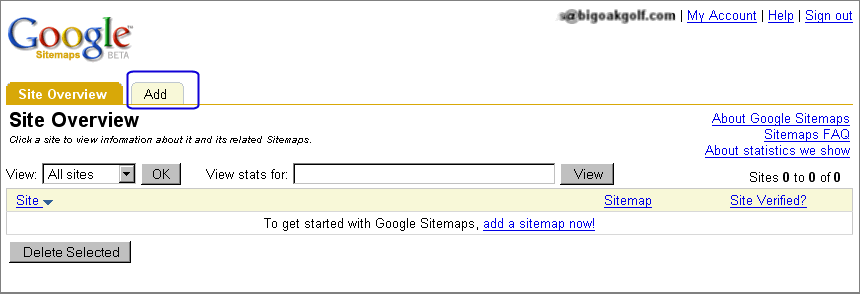
- Login to your Google account and click on the Add tab to add the Sitemap(s).
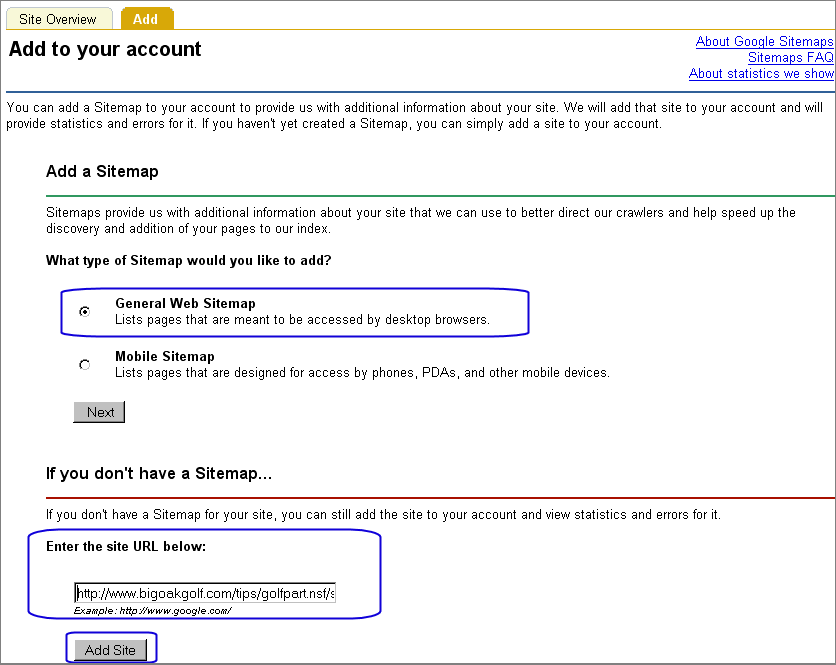
- You will get the following web page. Enter the url to the sitemap view and click the [Add Site] button.
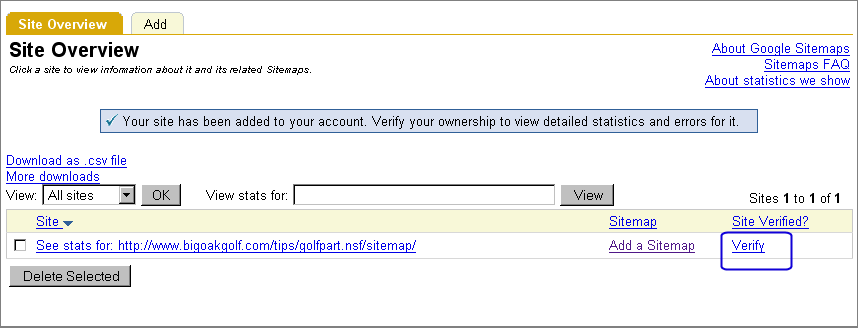
- Once added the site has to be verified. This is a one-time process for the first sitemap added. Click on the Verify link as shown in the screen image below.
- The following page is displayed next. You will have to create a file (any empty file) with the url as shown below.
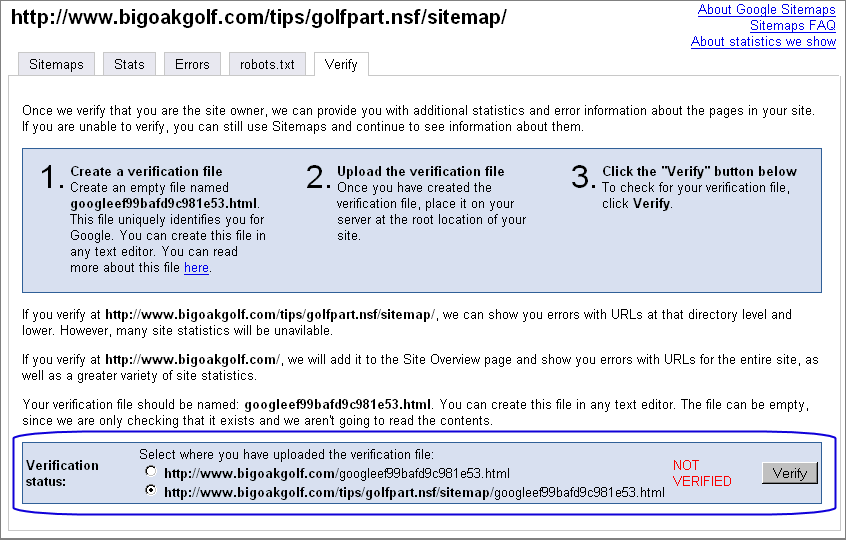
- The easiest way to create this verification file is use Notepad to create an empty text file with this filename. Place this empty text file in the Domino\HTML directory under the Domino data directory for your Domino server. Change the location to be the root of your website as shown below and click the [Verify] button.

- Google will display a message once it has verified your site:

- Click on the Site Overview tab to view the information about your site. Once Google has indexed your site the information in the SiteMap column will change to indicate the sitemap was indexed.

- Repeat to add other sitemaps as needed.
|