| Date tip published: | 10/11/2004 |
| Description: | IBM Lotus added support for instant messaging to the Notes 6.5 client. This feature is included in the Notes license, there are no additional licenses required. IBM Lotus also enabled the mail template to allow instant messaging. This support includes showing who is on-line by looking at any view or folder (like your inbox.) When a memo is opened the user can also see who is on-line as well. Any "live" name can be right-clicked and a chat can be initiated. These features can be added to any Notes 6.5 application. This tip will show you how to add instant messaging support to your own forms and views. |
To learn more about Notes and Domino 6.5 use the following links:
Notes Domino 6 Application Development Update
Notes Domino 6 Certified Developer Package
 Add Instant Messaging to Your Applications Add Instant Messaging to Your Applications
IBM Lotus added support for instant messaging to the Notes 6.5 client. This feature is included in the Notes license, there are no additional licenses required. IBM Lotus also enabled the mail template to allow instant messaging. This support includes showing who is on-line by looking at any view or folder (like your inbox.) When a memo is opened the user can also see who is on-line as well. Any "live" name can be right-clicked and a chat can be initiated. These features can be added to any Notes 6.5 application. This tip will show you how to add instant messaging support to your own forms and views.
 Instant Messaging is Not Available for Web Browsers Instant Messaging is Not Available for Web Browsers
The Instant Messaging features are not available for web browser clients. These new features will work only in the Notes 6.5 client.
However, there is a Instant Messaging toolkit (formerly called Sametime Links) that can be used to add an instant message link to a web page using Domino. TLCC has written a developer tip on Sametime Links. Use the following URL to read this tip and get more information:
|
 User Preference to "Show Instant Messaging Status" must be Enabled User Preference to "Show Instant Messaging Status" must be Enabled
The user preference to "Show instant messaging status for names" must be enabled to display a person's instant messaging status. This setting is shown below and is accessible by selecting File | Preferences | User Preferences...
|
 Procedure: Enabling a Names Field for Instant Messaging Procedure: Enabling a Names Field for Instant Messaging
Use the following procedure to enable a Names field to show the instant messaging status:
- Edit the design of a form.
- Create a Names field that contains one or multiple user names in abbreviated, hierarchical format (for example, John Smith/Dallas/IBM).
- On the Control tab in the field properties, check to enable the "Show online status" option.
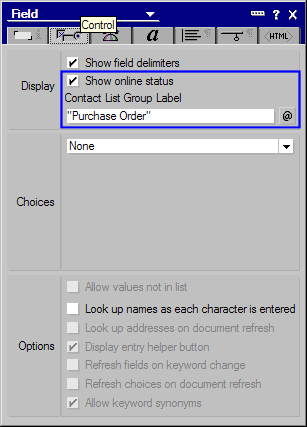
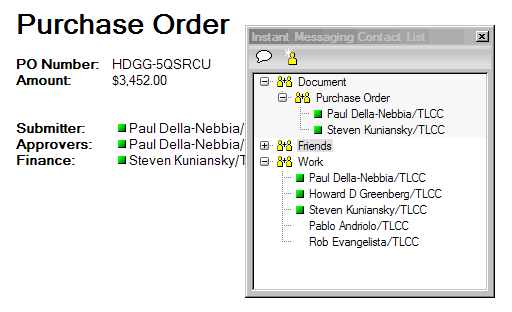
Optionally, enter a formula for the "Contact List Group Label". In the image above, the label formula is set to "Purchase Order". When this label is set and the document is opened, the available contact names in the document are displayed and grouped in the Instant Messaging Contact List under the specified label. The result is demonstrated in the following image. The Submitter, Approvers, and Finance fields are all set to "Show online status" and to use "Purchase Order" as the contact list label. Notice how the instant messaging status icon is displayed next to the names. Also notice how the available contact names are grouped under the "Purchase Order" label in the Instant Messaging Contact List. The group label and names are dropped from the contact list when the document is closed.
| On-line Status Only Appears in Read Mode
Note that the online status is only enabled when a document is in read mode. Newly created documents or any document in edit mode will not show the on-line status and the user will not be able to right-click on a name to initiate chatting with that user. |
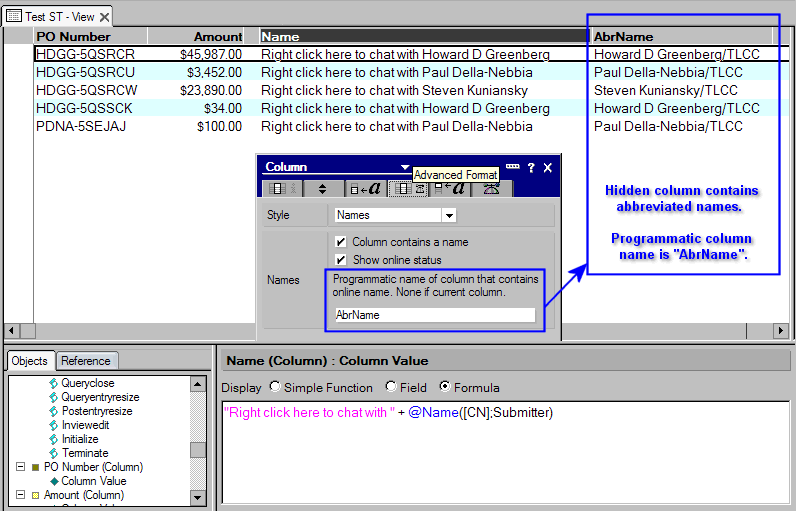
Procedure: Enabling a View Column for Instant Messaging
A view can also be enabled for instant messaging. Only one column in the view can be enabled for instant messaging links and that column can only contain one name. Below is an example of a custom view enabled for instant messaging:
Follow these steps to enable a column for instant messaging:
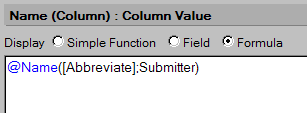
- Create a column in a view which will display a name in abbreviated format. If necessary, use the @Name function to convert the name to abbreviated format.
- In the column properties on the Advanced Format tab, select the "Names" style for the column. Check the column properties to indicate the "Column contains a name" and to "Show online status".
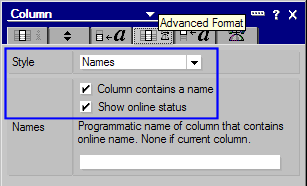
- Optional. To display any other text other than the abbreviated user name and still have the column show the online status use the programmatic name of another column that will contain the abbreviated user name. In the following image, the Name column is displayed in the view and the AbrName column is hidden. The hidden column is set with a programmatic name of "AbrName". This hidden column contains the abbreviated-format user names whom will be contacted when the user right clicks on the row and chooses to chat with that user. Notice how the properties for the displayed Name column indicate "AbrName" as the "Programmatic name of column that contains online name."
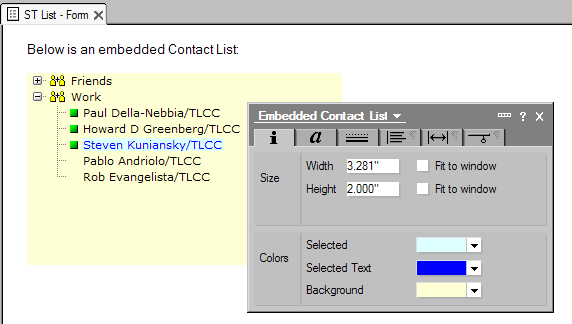
New Embedded Element - Instant Messaging Contact List
Domino Designer 6.5 provides a new feature to embed an Instant Messaging Contact List in a form or page. Follow these steps to embed an Instant Messaging Contact List:
- Edit the design of a form or page.
- Locate the input cursor at the location for the embedded contact list.
- Select Create | Embedded Element | Instant Messaging Contact List from the menu.
- In the properties dialog, set the size and color properties for the embedded contact list.
 |